Thursday, February 26, 2009

chocolate raspberry scarf

I'm dying to make a scarf like this. It's a free pattern which you can find here. I'm not sure that I would use the suggested yarn or colors even although I do really like this combination. I'm really liking cotton these days and I don't think there's a brown in the cotton brand I like.
Can you tell I Y scarves??

Tuesday, February 24, 2009

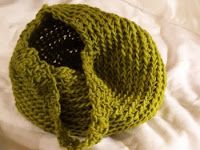
robins egg scarf

The Robins Eggs scarf isn't a pattern (that I know of but, you know.) It was kind of a spontaneous effort brought on by my finding the yarn at Joann's. It's Debbie Mumm Traditions in Robin's Egg Blue (I'm so original!) There are actually several really good colors in this brand but I was really drawn to the blue and cream in this little varigated wonder.

I can't remember the name of the stitch but I think it's a type of shell stitch. It's so simple, I think I could teach any beginner to do this in less than 10 minutes. Basically, you are doing three stitches in a loop: one single followed by two doubles. Then you skip the next two loops, repeat in the next loop. It makes an adorable pattern that reminds me of a popcorn stitch.

I bought three skeins hoping that would be plenty but I think two will end up being more than enough, as long as I don't go hog wild with the trim.

On a side note: I need to either give away or sell some of this stuff. It's not like I need it but I just love doing it so much...

Saturday, February 21, 2009

wrapped in crochet

I would say I'm not really a shawl type of person (seems a little stodgy) but Wrapped in Crochet may change my mind. Granted, a lot of the patterns don't exactly look practical-- the finished product being so open they can't possibly keep you very warm. But wow are they beautiful.

That I'm even considering attempting one of these bad boys is a little intimidating. If I start now, maybe I can finish it by next Fall.

Tuesday, February 17, 2009

the boyfriend basketweave scarf

I discovered a yarn store convenient to me on White Bridge Road called Haus of Yarn. They had a great selection but, unfortunately, most of what they carry is significantly more expensive than what I usually buy. On a side note, as with any big purchase, buying luxury yarn is borderline tortuous for me. I feel extreme pressure (brought on by myself) to make the right decision… the perfect choice. Because if I’m going to invest so much in a single item, it has to be worth it. Buying my camera was awful. Same with my car and my laptop. Absolute agony.

So after an hour or so of making laps and picking up the same three or four yarns and carrying them around… followed by putting it up and carrying the next one for a lap or two… I settled on Misti Alpaca chunky weight yarn. I don’t know the color but I think it’s Ember Melange. It looks chocolate-y brown in some light and deep maroon, purple in other. I love this yarn for its squishy texture. It’s worthy of burying your face in it—except that makeup smears on lovely eggplant alpaca (over which you’ve conducted a one-gal debate tournament in your head) doesn’t really work.

I’m using this yarn to make the “Boyfriend Basketweave Scarf” featured in the Chicks with Sticks book. To do this pattern, the only stitches you need to know are double crochet and half-double. You’re using these basics to do front post stitches and back post stitches. This is basically coming down into the post of the stitch (from the front or the back, respectively)from the previous row, instead of the top loop. You’re alternating three stitches from the front, three from the back, etc. and it creates a basketweave texture. How anyone figured out how to do this, I’ll never know. But then, I say that every time I do a new pattern.

The end result is a really simple piece, double thickness of the stitch—because each row overlaps the previous one by 50%-- in a fairly masculine color and texture. If someone else were to attempt this pattern, my only tip would be to establish a habit of consistently ending on either a back row or a front row every time you put the piece down, so you always know how to start again when you come back. There is a pattern of how to start and end each row and how to alternate and failing to be consistent will result in an uneven weave, one row usually appearing too long.
***I lightened the color on the photo so you could actually see some of the texture. This thing seems to suck all the light from the room.

Saturday, February 14, 2009

Now I understand the whole carb thing with marathoners...

When I work out, I typically stick to weight lifting and occasional hiking. I find straight-forward aerobic activity to be tortuous and dull and have a long long looong history of doing whatever it takes to avoid it. This weekend I had my first aerobic victory-- followed by injury... or maybe just radical soreness.

Friday night my boyfriend took me out to have Italian for our early Valentine's date. I carbed up on a massive bowl of whole wheat pasta (followed by a pomegranate martini and wildberry sorbet.) Waking up this morning I thought a stout workout would be a good idea, if anything, to do some damage control and so I promptly hit the gym.

I went to the treadmill since I didn't have a lifting routine preplanned and didn't want to wing it. I then proceeded to run almost 4 miles (run, people!) with only a handful of very brief walking breaks. It may not sound like a big deal but you have to keep in mind, before today I have never ever run more than maybe a minute at a time before slowing to a walk. And I never do enough aerobics to built more stamina. And I loved it. In fact, I wish to God I could go run right now-- except that my body is screaming out in agony. Whoops.

Saturday, February 7, 2009

the Manos project: part III

finished!!

Thursday, February 5, 2009

the Manos project: part II

Last night I completed another stage in the Manos project, crocheting the two flowers for the “Pocket Full of Posies Purse.” The pattern called for yarn in fuschia and pink. However, the fuschia appears to have been discontinued and I was unsure of whether or not I liked what they called pink… it looked like a really blue pink. I really wanted a nice, warm coral pink.

I ended up selecting Manos yarn in Rhubarb and Henna from the website—knowing I could end up with colors that are in reality nothing like how they appear in the photos. I took my chances anyway.

I was mostly happy with what I chose. The Rhubarb was a nice purple-y-pink. Henna was a tiny bit more peachy than I wanted but I don’t dislike it. It’s just not what I expected.

I started with the Rhubarb. I completely misread the pattern and ended up making a long strip with lots of small, rounded petals. When I wind it into its intended bud-shape, it almost looks like a peony or a poppy. I immediately realized what I had done but decided not to redo it as I really like the effect of two completely different types of flowers. This one is big and petal-y and full and somehow appropriate for its bright pink color.

The Henna was done as the pattern was originally intended and will look more like a true rose, also very pretty and sweet. I can’t wait to get everything properly assembled and completed!

Wednesday, February 4, 2009

the Manos project

The Manos del Uraguay yarn I ordered arrived yesterday so (of course) I immediately got to work on my Manos project. I’m doing a pattern from "The Chicks with Sticks Guide to Crochet" by Nancy Queen called “Pocket Full of Posies Purse.” It’s a small, round green bag, felted, with two big flowers on the front. I’ve seriously wanted to make this thing for about 6 months. Not sure what my fascination is.

I finished the main body and handle of the bag and felted it before going to bed. Hopefully I can finish the flowers tonight and can do the finishing before the weekend. In the meantime, the bag is taking longer to dry after felting than my projects have taken in the past. Previously, I allowed my pieces to go through the cold water cycle and spin before I did my last minute shaping. Since Manos del Uraguay was a little more of an investment than I usually make, I followed the explicit instructions that came with this pattern and did a cold rinse and towel-blotted by hand. Maybe it will be dry by tomorrow… we’ll see.

I used maybe half as much yarn to make my bag as the pattern required though and have an entire hank of Citric green left… which begs for one last creative effort before I taper back on the crochet until next fall. We’ll see where that leads. Not to mention, I did 75% of the work for this piece in one night. Six months of waiting and now it’s over. I’m too fast I think.

Tuesday, February 3, 2009

adventures in felting: the tote

I've been wanting to try felting for a long time. One day while browsing in Michael's, I impulsively bought several skeins of wool yarn. The yarn I chose was Patons Classic Wool in Aran (1), Dark Grey Mix (1), Leaf Green (2) and That's Pink (1). I used a 5.5mm hook, single crochet throughout, to create the individual pieces for my project, a tote bag.
I crocheted two side panels which measured about 17" x 17" before felting and one long green strip which was about 53" x 4" to go around the edge.
I did not use a pattern although I have seen similar totes to this in several books. I decided I wanted the slit-handle to be rolled down over the liner so I slipstitched the handle together, leaving the sides unattached so it could overlap the liner later. All of this was kind of off the cuff and I was interested to see how (and if) it would work.
I put somewhere between 12 and 15 hours into crocheting. I feel like my stitches have looked really good lately... which doesn't matter one iota when you're felting. It's amazingly forgiving as everything tends to matte and blend together, minor flaws melting in with the good stuff. Nonetheless, I put a lot of effort into the individual pieces... which makes throwing said good pieces into hot water slightly sickening.

felting

For my purposes, I was interested in felting with hot water. There are other methods that involve the use of needles and various tools to be used manually. I avoid needles and such as I am prone to accidents… and I would rather just let my washing machine do the work anyway.
There are multiple methods and rules for water felting—and they tend to contradict each other. Some people say to use very hot water. Others say not so hot that you can’t handle the piece. Some say to never ever ever rinse in cold water, some say do. Some say spin, others say don’t. I decided to follow the closest thing I could find to manufacturer’s instructions which I found here.

The hardest part was throwing the pieces into the hot water knowing it was about to be irreparably altered. And boy was it. It was amazing to pull a completely different product out of the machine. The strangest thing about the felted piece was how pliable it was while it was still damp. You have a certain ability to reshape the piece until it’s dry, then it’s game over.
I chose not to iron once I was done but I did have to do some minimal trimming where I had woven the ends back through from the color changes. Now you can’t tell anything was ever there.
I've read various info about how much size your piece should lose in the felting process. One website said the length and width shrink unevenly-- which is true I guess to some extent but my piece kept its original ratio for the most part. I did read that you can expect to lose about 30% and I would say that this was pretty accurate of my project. I'm sure it depends on the yarn you are using... The striped panels shrunk pretty evenly. The green strip ended up being about 4 or 5 inches too long but, with felting, you can just trim it to what you need as the stitches have all joined together and it behaves more like fabric.

I decided to hand-sew the bag together for the most part, out of fear that the fuzz could get caught in the foot pedal of a machine. It took several hours of hand work after which I remeasured to decide what size to make the lining. I did machine-sew the lining together then hand sewed it into the bag, finishing by folding the top edge down over the liner.
I love how the bag turned out. It’s actually better than I expected.
Anyway, I think I invested about $25 into supplies and 20-25 hours of my personal time. A hefty time investment (compared to the stuff I normally do) but I think well worth it. I did record my basic pattern as I went so I do have a record of how to recreate this bag for the most part.
Cheers!